Happy October! For my fellow haunters out there, this marks the start of the season when we can come out of the woodwork and not be looked at as crazy people the minute we purchase a plastic skull (in July) because thats when we need to start designing our decorations. Rejoice! Be free, and start putting up your haunts!
We'll try to post one new Halloween DIY, decoration, or gruesome idea at least 3 times per week to make sure that we can keep up with the madness. This means lots of pumpkin carving, spooky sweets, and Halloween haunt ideas to come.
Be sure to bookmark our Halloween page and check back often for updates!
Happy Haunting!
Pam and Silas
Thursday, September 30, 2010
Corpsified
As part of our haunt, we're changing things up a bit. Originally, I had planned to do a sleigh pulling a skeleton santa, but both my sleigh and the reindeer pulling it fell through. I began the process of creating small elf skulls today, as there is nothing scarier to me than child-like skeletons.
Since we're living on a limited budget, and can't just buy those terrible dead babies from the Halloween store for all of our props (besides, what fun would that be??), we have to find a way to make $1 skulls look like something hideous. When you want to take a step towards the extreme, corpsification is the way to go. I learned this technique from Mad Haus Creative, who is an excellent craftsman.
Start by gathering your supplies: $1 skull from the dollar store, small can of wood stain, bottle of stainable wood glue, an old kitchen sponge, and the cheapest tissues you can find. All and all, this set me back about $7, with the most expensive item my $3.20 bottle of wood glue from big lots.

Most tissues are 2 ply - if yours are 1 ply, congrats, you've just cut out a step for yourself. If yours are two ply, take about ten tissues, and pull them into 1 ply - you'll end up with 20 1 ply tissues. Pour the wood glue out on a paper plate, and lay down a plastic sheeting - this gets messy.

When you're ready, take one of the tissues, wet it in the wood glue, and place it on the skull. Don't smooth it - you want this to be bumpy.

Keep doing this until you've got the entire skull covered in tissues and wood glue. Any areas that aren't covered in wood glue, you can take your fingers, dip them in wood glue, and then dot where you've missed. This is what it should look like when you're done.

Let the skull dry completely, and then take your old kitchen sponge - I ripped mine in half to make it even more manageable, and dip it into the wood stain. Apply all over the skull, darker in some areas, lighter in others, and this is what it should look like when complete:

Now, instead of having a crappy looking plastic skull, you've got a skull, with what looks to be decomposing flesh on it. Horrifying!

Sunday, September 26, 2010
Tombstone
Our tombstones last year (made out of one inch thick pink insulation - you can buy it at Home Depot) were great, but a little flimsy for year after year use. After seeing the great hit our Haunted Christmas Theme was, we decided to make things a little more permanent.
We started by heading out to Home Depot to pick up 2 inch thick insulation. You get a huge sheet for about $15, and we also picked up yet another utility knife, since we just weren't sure we had enough ;). Si is a master at cutting various shapes, while I'm more into the decoration factor, so he went to town on cutting various shapes. You'll get about 5-6 tombstones that are pretty good size from this. Here are a few that we cut:


Following cutting, I carved one to fit our Santa theme specifically, and then painted it with gray acrylic paint. While the paint is still wet - add drops of black paint, and blend with the paintbrush used to paint the stone gray. It blends well, and helps the "stone" look aged.

Following that, I painted my carvings with bright red paint to simulate blood. Remember that it's kind of like stage makeup. What might look garish up close, will look perfect when dimly lit and viewed from a distance. Here's what the finished product will look like:

In order to try to make the process a little faster, we had purchased some gray spray paint at Walmart to do an initial covering. We decided Si should do the painting this year, as last year, I has used the second room to do the painting (I put down a drop cloth!) but soon found that spray painting indoors is not a good idea. We spent the rest of the night shampooing the carpet! We took the spray paint outdoors, and did an initial coating. Much to our surprise, the spray paint began eating away at the insulation. Once we trained where we wanted it to eat away, we came out with some amazing looking stones.


After they dried, it was my turn to step in. I put a final coat on the tombstones, and while wet, mixed in that black to help it look aged. With the tombstone on top, I wet a sponge brush and then dipped in black paint squeezing over the top and sides to get a weathered look. With the bottom tombstone, I carried the aging further, and wrote Mrs. Claws to keep with our Haunted Christmas theme. You could write anything, but the key in our minds is to make it look weathered.


Based on experience last year, use straight stakes (no hooks on the ends), stick them into the ground, and then push the tombstones onto those. And there you have it. Five creepy tombstones for less than $20 total, with paint, brushes, and insulation included. When even low cost stores are selling then for $10 a piece, this is a steal! Bonus: Nothing beats making your stones as tailored as you want.
Tuesday, September 7, 2010
Onion Blossoms
Si and I both have a severe addiction to the onion blossom made by Outback Steakhouse. One of these easily makes a meal, and while not the most nutritious of dinners, it certainly hits the spot. So here it is, the recipe that we utilize for making this wonderful treat.


Start out by grabbing a giant spanish onion, and by preheating the vegetable oil in a small saucepan.

First to note - it is next to impossible to slice the onion blossom like Outback Steakhouse, so you can take our approach, which involves slicing the onions into slivers, as in the image below:

Second, grab two large bowls, one for the "wet ingredients", and one for the "dry ingredients." Combine one large egg and one cup of milk in the "wet ingredients" bowl, and beat until well blended.
In the "dry ingredient" bowl, you'll need to combine the following ingredients:
- 1 cup of flour
- 1 and 1/2 teaspoons of salt
- 1 and 1/2 teaspoons of cayenne pepper
- 1/2 teaspoon of ground black pepper
- 1/4 teaspoon of dried oregano
- 1/8 teaspoon of thyme
- 1/8 teaspoon of cumin
Following combining those ingredients, you should have two bowls that look kind of like these:

Now for the fun part. Take a slice of the onion, dip it into the "wet mixture", and then into the "dry mixture" coating it completely. Do this with each slice (it's easy to do a bunch at a time), and you're ready to go!
They should look like this on completion:

Put the onion slices in the vegetable oil - the oil should be ready if you started it before this process. Add as many as you can, but don't "double stack" in the pan - they'll stick together. Cook until slices are browned, and then remove to a paper towel to soak up the excess grease.
[Note: One of the things we found was that you need to have your oven vent on or else your house will smell like a combination of Fried Chicken and Onions.]
[Note: One of the things we found was that you need to have your oven vent on or else your house will smell like a combination of Fried Chicken and Onions.]

In between cooking batches of the onion slices, whip up the Outback dipping sauce with this great recipe:
- 1/2 cup mayonnaise
- 2 teaspoons ketchup
- 2 tablespoons cream-style horseradish
- 1/4 teaspoon paprika
- 1/4 teaspoon salt
- 1/8 teaspoon dried oregano
- Dash of ground black pepper
- Dash of cayenne pepper
There! Following completion of the onion slice batches and your dipping sauce, the slices should look like this:

Enjoy!
Monday, September 6, 2010
Maple Leaf Candies
While we were in the Cape, in every shop that we went in, I noticed Si stopping to look at these weird maple leaf candies. I don't think that I'd ever seen them before, but I sure know a lot about them now. I decided that since the weather is chilled, and fall seems to be nipping at our heels, I would try out this recipe for Maple Leaves candy, and it turned out fantastic.
I made two batches, following the online recipe. I made some changes for my second batch, and I'll spell out the recipe, so no need to open a new tab!
For your benefit, I've laid out the ingredients, but usually while cooking, you can find me stirring with one hand, the other hand in the refrigerator, and a foot opening a cupboard. Here are my starting tools and ingredients:

Also, prior to starting working, I always put on the lovely apron that Si got me for Valentines day. Aprons, while they may seem old fashioned, are great multi-taskers. They keep your clothes clean, and I usually keep a wooden spoon as well as a tea towel in the apron pockets. Useful!
Alright, onto the actual cooking. Spray your candy mold with a cooking spray to ensure that the candies don't stick, and add two (2) cups of maple syrup to a saucepan. (Be sure to use pure maple syrup. Most table syrup contains less than 2% maple syrup.)

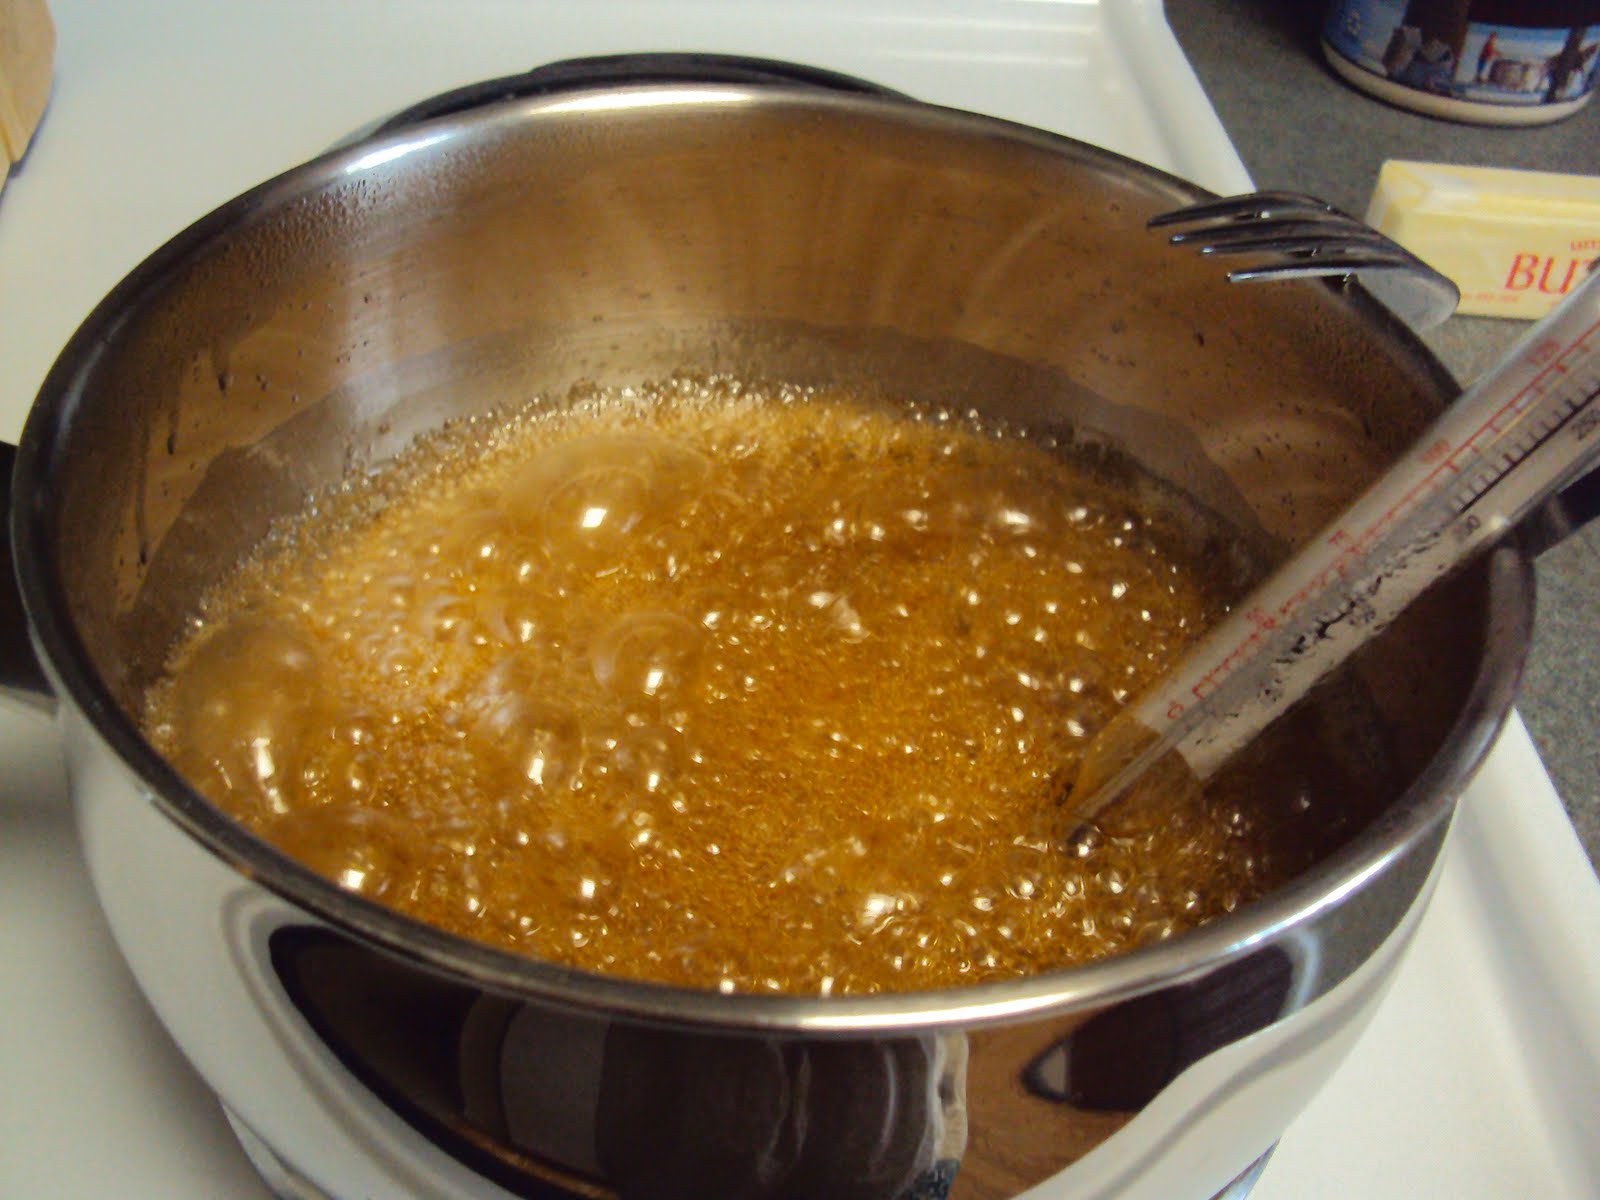
Turn the maple syrup pan up to medium heat, and let it get warm. Add one (1) tablespoon of butter to the mixture, and stir in to include. Insert candy thermometer in the mixture, and bring the mix up to 240 degrees.

Once the mixture hits 240, I found the easiest way to get the perfect mix is to immediately pour it into the measuring cup - please be careful here. Following pouring the mix into the measuring cup, I immediately whipped the mixture with the end of a wooden spoon.


Let it sit for a little bit, and then pop them out of the molds. Voila!

I made two batches, following the online recipe. I made some changes for my second batch, and I'll spell out the recipe, so no need to open a new tab!
For your benefit, I've laid out the ingredients, but usually while cooking, you can find me stirring with one hand, the other hand in the refrigerator, and a foot opening a cupboard. Here are my starting tools and ingredients:

Also, prior to starting working, I always put on the lovely apron that Si got me for Valentines day. Aprons, while they may seem old fashioned, are great multi-taskers. They keep your clothes clean, and I usually keep a wooden spoon as well as a tea towel in the apron pockets. Useful!
Alright, onto the actual cooking. Spray your candy mold with a cooking spray to ensure that the candies don't stick, and add two (2) cups of maple syrup to a saucepan. (Be sure to use pure maple syrup. Most table syrup contains less than 2% maple syrup.)

Turn the maple syrup pan up to medium heat, and let it get warm. Add one (1) tablespoon of butter to the mixture, and stir in to include. Insert candy thermometer in the mixture, and bring the mix up to 240 degrees.
Once the mixture hits 240, I found the easiest way to get the perfect mix is to immediately pour it into the measuring cup - please be careful here. Following pouring the mix into the measuring cup, I immediately whipped the mixture with the end of a wooden spoon.

When the mixture starts to thicken slightly, pour into the molds.

Let it sit for a little bit, and then pop them out of the molds. Voila!

Subscribe to:
Posts (Atom)