Well, the holidays have now past us, and there are now 364 more days until next Christmas. I don't know about you guys, but Si and I are just plain exhausted. Today, we ran out to the store to stock up on some groceries, as well as stop over to Target to see what sort of after Christmas sales they were having. I was thrilled with the selection of holiday gift wrap to be had (at 50% off!) and quickly stocked up on 6 different rolls of wrap, as well as matching bows, and gift tags. I'll have so much fun next year!
Now that the holidays are past, it's time to start focusing in on the year ahead, and the great projects that we'll be embarking on! Happy Holidays to one and all!
Sunday, December 26, 2010
Monday, December 13, 2010
A Krispie Treat House
Si and I tried to create two gingerbread houses last year - one using graham crackers and sweets, and the other an actual gingerbread house kit, with all of the trimmings. I can say without a shadow of a doubt that we will never manage to create a gingerbread house that actually stands, but this year, we embarked on our quest anyways. We thought that perhaps we would use rice krispies this year. It started out well enough.
Everything seemed to stick together well enough. We tried to let it dry for a bit, while worked on "landscaping". Cotton candy snow, gummy trees, gummy snowmen and little gummy bears playing in the backyard. Then it came time for the roof. Can I recommend that if you are going to do this - you let the rice krispy treats get stale and hard? We started with a natural peak roof. Very exciting. We even used toothpicks to stabilize.
All of a sudden, I notice that Silas has eaten half of the snow from the yard. That's when he says "Honey, I think that's the least of our problems." Our roof is now flat. I don't know what possessed us, but I believe our next thought was, let's at least make the roof look good. So we pile on other items. Eventually, we end up with this:

Sunday, December 12, 2010
Cocoa Cones
When I'm in stores shopping for tacky Christmas themed stocking stuffers (I love them!), I always run across these great cones that are used for hot cocoa. They're usually around $5 for one serving of cocoa, and I'm always in awe of how they manage to rip people off for this type of thing!
Here's a little tutorial on how to make around 20 of them for around $7. Quite the bargain! If you take a ride around the fabulous internets, you'll see how other crafters are doing this as well.
For your basic cocoa cone, you'll need 2 packs of marshmallows, 2 boxes of individual Swiss Miss serving packets, 1 bag of chocolate chips, and a 24 count of Disposable icing bags. Your local grocer can handle most if not all of these, with a possible exception of the disposable icing bags. Do yourself a favor and head out to your local JoAnn's, AC Moore, or Michaels, and pick these up - make sure to snag yourself a 40% off coupon (I get mine here!)
Alright. Now that you've gotten all of your ingredients assembled, I like to take over the dining room table, and really spread out.

First, start by opening up one of the frosting bags and pouring in one of the hot chocolate packets:

Second, layer on the marshmallows and the chocolate chips:

Then, twist the top of the decorating bags, and tie off with a piece of curling ribbon. Voila! Your first cocoa cone.

Keep working through your ingredients until you've exhausted your supplies. These make perfect stocking stuffers, as well as small coworker gifts; and for much less expensively than you can buy in the store!

Monday, December 6, 2010
Hanging Holiday Balls
Since we've put up our Christmas tree, it's time to spruce up the rest of the house. I embarked on creating this amazing hanging holiday ball, to hang over our dining room table.


First, grab a styrofoam ball, some ribbon, and leftover ornaments that you don't use anymore, or purchase shatterproof ornaments from the dollar store (I got mine for $3 a piece at Walmart). I find the smaller ornaments work best for this.

Start by securing a length of ribbon into the ball. I did this with floral wire, and it stayed pretty well.

Then, you can start pushing in the ornaments. You can use floral wire to make them more secure, but after doing that for the first few, I went with hot glue instead. You can't see the hot glue at all, and it makes the overall ball extremely sturdy.
If you continue placing the balls, you'll get a beautiful looking ball that looks wonderful above a dining room table. Finished, the ball is about the size of a basketball.

Sunday, December 5, 2010
Jar Mixes
I've been accumulating items for our yearly Christmas baskets, and along with that, decided to acquire items that would allow me to make a bunch of soup in a jar mixes.
As I was browsing around, I found a few great sites with Soup in a Jar recipes, and it turns out that they're perfect for someone like my Nana, who is sometimes just looking for a quick and easy meal. I chose out recipes that I thought she'd like, and went to work.
First, pick out a recipe, and pick up the necessary ingredients (don't forget your mason jars - quart size are normally best). It doesn't end with soup, as you'll quickly see from these great sites.
- http://www.allfreecrafts.com/giftinajar/
- http://www.kitchenlink.com/holiday/merrygifts.html
- http://christmas.organizedhome.com/recipes/gifts-in-a-jar
Second, start by laying out all of your ingredients, and washing your mason jars.

The rest is easy! Follow the instructions , add a fabric circle on top of each one as well as your instructional tag, and you should end up with a gift that looks adorable and useful, just like these!

*Tip: Make sure that you have attached the instructions for how to make the jar mix into something edible! I made some of these last year, and forgot the tag, and it was so embarrassing!
Saturday, December 4, 2010
Mini Elf Stockings
In an effort to keep gifts simple yet thoughtful this year for my young cousins, I'm creating mini elf stockings, by taking the same template that I used for Si and myself for stockings, and shrinking it by 50%. You can find the template here.


These will be stuffed with Christmas candy of any child's dreams (and a teether for the little one who can't quite manage candy right now).


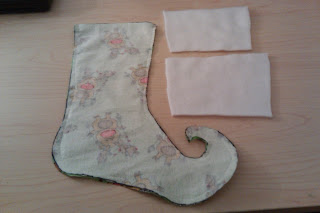

I began with a few different kinds of cute fabric from JoAnn's. I chose an extremely soft cotton fabric that's kid friendly, but could also be through in the washer and withstand the force. Like I said, it's kid friendly. Here's a shot of one of the kinds I used:

I took the pattern and traced it out, of course forgetting that I was going to need to flip the pattern over, and getting two of the exact same thing (what you really want are mirror versions of the exact same thing. See Below.)

Fold them together pattern side in, and sew along the edge, about a 1/4 to a 1/2 inch in, whichever you feel most comfortable with. Go 1/2 inch for more durable, but skinny stockings, or go 1/4 inch for slightly wider, but less durable stockings. Either way, these are meant for a little bit of candy, not your standard stuff-until-it-can't-go-any-further stocking.
Following sewing, I got out the white fleece for a perfect "top of stocking" look. I cut two squares, trimmed them until they fit. They look like this:

That one on the top may look smaller, but it's not, it's just the camera angle (sorry guys!). With the stocking turned inside out, I put the white fleece on either side (half overlapping with the stocking, and sewed down the seam. This will attach it to the stocking.
Post sewing the seams, I turned the stocking right side out, pushed the tiny tip out with a butter knife, and there we go! An adorable mini elf stocking perfect for stuffing with small candies, chocolate lollipops, and a wee bit of rock candy!

Friday, December 3, 2010
DIY Gift Tags
Every year, I tell myself I'm going to create amazing, unique gift tags that are really going to blow people away. And every year, it gets down to the last moment, and there I am in Walgreens on Christmas Eve buying the last of the Christmas tags they have to offer. Which are usually not super great. Suffice it to say, people are usually not blown away.

This year, things are going to be different! Using some of the leftovers from the cards I created yesterday, I've decided to make my own Christmas tags this year. Super easy, and in all different shapes and sizes!

Be sure to keep some ribbon on hand, as well as a hole punch, so that you can put your tags anywhere. Whew! Is it really 23 days till Christmas? Feels like it's getting close!
Thursday, December 2, 2010
DIY Christmas Cards
Happy December! Today, we're talking Christmas cards, as it's important to get those out this week.
This year, we've decided to make our own Christmas cards. With a little high quality paper, and a lot of creativity, it's no problem at all!
Here's what you'll need:
- Assorted Paper in Christmas-y Colors or Themes (Michaels, AC Moore, JoAnn's)
- Glue Stick, or Glue Dots
- Wooden or Plastic Stamps
- Stamp Pad in Assorted Colors
Also - side note for those of you out there who'd like to design their own cards, but don't want to cut the paper, and put it all together - most craft stores sell blank cards in a variety of colors and themes, making this super easy.
Start to think of ideas, and do a trial run with one cut. If you don't like it, of course, start over. I like to try out three different designs, and usually come out with one I like best.
Once you've decided on a specific design, create in bulk!
Here is our favorite design for this year!


Wednesday, December 1, 2010
Our Christmas Tree!
We put up our Christmas Tree tonight, because the first snow was today, and it is December 1st. We went to Gro-Moore Farms, the same place that we got our tree last year. After picking out the tree, they bundled it all up, and did a fresh cut on the stump. Just like last year, we asked for the small section of stump back, and strung a ribbon through it. It's a perfect memory of our Christmas trees past, though in 25 years, I'm sure we'll wonder what to do with all of these "ornaments"!
Here are some photos of our most perfect Christmas tree. We love it!
 |
| Here is the tree before we started cutting it out of the mesh that holds it all together. |
 |
| This is Tygg's idea of helping with the Christmas Tree. He's supervising. |
 |
| Here are our first shot at LED lighting. There are two strings of 60 lights on there. |
 |
| This is the fabulous cat ornament that we just received as a gift. Thanks Alice and Robert! |
 |
| Here is the ornament that I gave Si for our Christmas tree this year, in honor of our fantastically funny snowman of 2010. |
 |
| Here is the ornament that Si got me for our Christmas tree - it's a Sandwich, in honor of our trip to Cape Cod! |
 |
| One of the ornaments we bought to commemorate our first vacation this year! |
 |
| Here is a shot of the completed tree. It's hard to see how great it looks, but it is just perfect! |
Subscribe to:
Comments (Atom)